Wednesday, January 25, 2006

Chayote Squash Salad

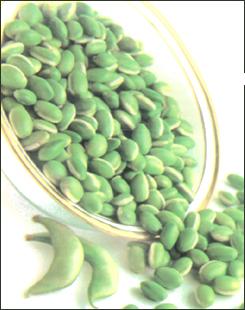
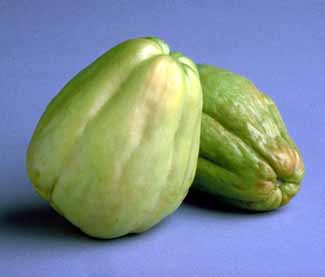
For those folks who do not know what a Chayote Squash is, here is a picture from one of the Google Searches. It is called as Seeme Badhanekayi in Kannada. I like the vegetable a lot especially if two items are prepared with it - Upma and Raita. So, as usual my wife (Priya) gets into the kitchen to make the night's dinner. It was tacitly understood that she would be preparing Papdi Lilva Sambhar and Rice. Now we needed some curry to eat along with the sambhar. So, Priya gets to chop the Squash. I jumped in and seized the moment - I told her, let's make raita with the squash instead of the plain curry. She agreed and continued to cut the vegetable. Needless to say we all enjoyed the food with the raita. Here is how you can prepare it too and enjoy then same...

Ingredients:
[1] Chayote Squash - 3 to 4
[2] Mustard seeds - 2 teaspoons
[3] Cumin seeds - 1 teaspoon
[4] Urad Dal - 1/2 teaspoon
[5] Chana Dal - 1/2 teaspoon
[6] Chillies - 4 to 5 depending on the level of hotness you want
[7] Coconut - 1/2 to 1 cup (I know the size of the cup is left to you, but still ...)
[8] Turmeric - a pinch
[9] Buttermilk - 2 cups
[10] Cilantro leaves - 1/2 a bunch finely chopped
[11] Ginger - a bite to taste
[12] Salt - to taste
[13] Water

Recipe:
[1] Start out by chopping the Squash into fine pieces
[2] Place the frying pan on medium flame. Add some oil and allow to heat for sometime
[3] Put in a teaspoon of mustard seeds to the heated oil and let it spatter
[4] Then put the chana dal and the urid dal and nicely stir to fry the dal. Make sure you don't burn the dal and believe me the urid dal is the one that gets black first :)
[5] After the dal has fried to brownish color, add the chopped the Squash and allow to cook
[6] Add some water and close the lid to make the cooking faster, but make sure you keep the flame in low heat as the high flame might burn your pan
[7] Stir occasionally until the Squash is cooked
[8] While the vegetable is getting cooked, prepare the raita masala
[9] Put the coconut in the mixer along with the chillies, cilantro, turmeric, ginger, cumin seeds, and mustard seeds. Add some water and nicely grind the mixture to make a fine puree
[10] Then add some buttermilk to that and mix well
[11] After the vegetable is cooked turn off the flame and allow to cool
[12] Once cooled, add the buttermilk mixture to the vegetable andmix well
[13] Add salt to taste and serve with chapati or rice

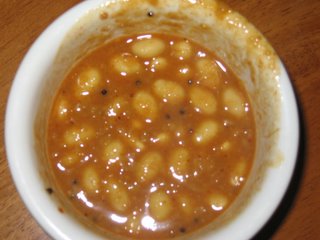
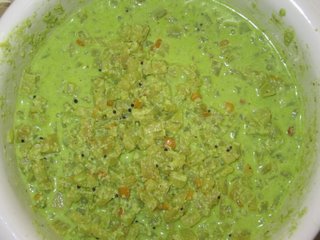
How does it look? Does it look like the picture below? If not then don't worry - just tinkle in to our home and we will make it and also serve it for you. What do you say?


Friends, hope you are enjoying my blog on Indian Vegetarian recipes...

Good night until tomorrow

Tuesday, January 24, 2006

Papdi Lilva Sambhar

I still remember those days in Bangalore when I grew up around Papdi Lilva. For the non-kannadigas papdi lilva is the twisted english version of avarekayi. Actually papdi lilva is not the exact english phrase for avarekayi, but still its fine to pull out a conjecture. See the adjoining picture and you will get a clearer picture of what it is we are going to talk about. So coming back to those good old days I grew up in Bangalore, I still remember my mom and grand mom preparing every dish with avarekayi. In the season the beans sell for like 5 bucks a kg and we used to bring in loads of it. Hence it is pretty natural for me to love this particular beans in the family of beans. Although papdi lilva is not termed as beans, it is a bean after all. What do you say? Check out the picture for goodness sake, isn't that a bean? :)

After having my afternoon lunch I left for work as usual today and when I came back home, my grand dad had kept the papdi lilva ready to be cooked. It was decided that we make sambhar with the lilva (believe me it is actually a discussion to decide what needs to be done with this papdi lilva, as anything can be done). What I like most of the papdi lilva - it is ubiquitous. Any dish can be prepared with this. So I started to help my wife in the kitchen to prepare the dish. I know you must be thinking - hey dude, cut the crap and tell us how to make it...Here I unroll it for you

Ingredients:
[1] Papdi Lilva - 3 to 4 measures
[2] Toor Dal - 2 measures
[3] Tamarind
[4] Tomatoes - 2 to 3
[5] Chili powder
[6] Sambhar powder (prepare one on your own, I will tell you how later someday in my blog OR get it from a strore selling MTR products)
[7] Mustard seeds
[8] Asafoetida (Hing, dude)
[9] Turmeric
[10] Oil
[11] Salt - to taste
[12] Water

Recipe:
[1] Take some dal in a pressure cooker and to that add the papdi lilva and water. Add enough water depending on the quantity of the sambhar you want to prepare
[2] To this add a spoon of oil and some turmeric
[3] Do I need to need to tell what to do next? :) Put the cooker on a flame and allow it to whistle 2 or 3 times. Once the dal is done you can turn off the flame under the cooker
[4] Its not that the cooker is going to whistle the moment you keep it on the flame, so lets get to work with the tamarind paste while the dal cooks :)
[5] Chop some tomatoes and put it in a mixer. To this add some tamarind (either the paste or the actual tamarind) and water and grind nicely
[6] Filter the tomato and tamarind liquid from the tomato skin/tamarind seeds into a separate vessel
[7] Put the vessel on a medium flame and begin heating
[8] To this add about 3 or 4 spoons of chilli powder and nicely mix the powder in the liquid making sure there are no knots
[9] After the liquid boils add some sambhar powder (3 to 4 spoons depending on how thick you want the sambhar) again making sure there are no knots formed
[10] Allow to boil for some time until the masala cooks
[11] Hopefully you have not forgotten to turn off the flame under the presssure cooker...
[12] Now add the dal + papdi lilva to this liquid and nicely mix the two
[13] Add some salt to taste
[14] Add some seasoning - to some heated oil add mustard seeds and allow to spatter and then add some Hing
[15] Serve hot with rice

Here is one tip: If you want to make sambhar that is less viscous, you can skip Step [9]

Enjoy folks, this dish is very tasty. My stomach is already rumbling

Good night!

Monday, January 23, 2006

Yellow coconut curry

Well, Raddish is one of the stinky vegetables that no one wants to open it's dish in public. Yet, yet it's dishes are indeed tasty (provided you stick to eating them @ the luxury of your own home, better yet in your own room). Today we had prepared Raddish Kolumbu. It was indeed yummy with the Apples & Bell peppers Gojju. Want a 'byte' of the kolumbu - here it is... Want to know how to prepare it?


Items you need:
[1] Raddish - a couple
[2] Coconut - depends on how many chillies you put
[3] Turmeric - a spoon
[4] Mustard seeds - a teaspoon
[5] Cilantro seeds - 10 to 15 seeds
[6] Red chillis - depends on the level of hotness
[7] Toor Dal - 1 or 2 measures
[8] Rice - a handful
[9] Salt - to taste
[10] Water - the universal requirement

Recipe:
[1] Put some Toor Dal in the pressure cooker alongwith some water (as if you did not know that). Put water enough to soak the dal and the quantity is upto you depending on how much kolumbu you want.
[2] Chop the Raddishes into roundlets. Put the cut raddishes in a vessel. Yes, you need to add water. Put the vessel for boiling in moderate to high flame.
[3] While the 2 are getting cooked, you are ready to make the spicy gravy for the kolumbu.
[4] Put some coconut, cilantro seeds, rice, turmeric, mustard seeds, red chillies and water into a mixer and grate them finely.
[5] Once the pressure cooker whistles for about 2 or 3 times, turn off the flame under the cooker and allow to cool.
[6] Check if the raddish is cooked and if so, add the grated gravy to the raddish
[7] Let the mixture cook for sometime under a low flame (Please take care in continously stirring the mixture as the base might get burned on the inside giving you a burnt taste)
[8] Once the mixture is cooked, add the cooked dal and stir to completion
[9] After it is cooked and boiled turn off the flame under the vessel and Raddish Kolumbu is ready!

Wasn't that easy? Just make sure you dont burn the vessel used for the Kolumbu.

Enjoy folks, feeling really sleepy after the sumptuous dinner.

Good night!

Apple and Bell Peppers Gojju

As usual I came home this afternoon and to my surprise my grand dad had prepared Apple and Bell Peppers Gojju. For those who do not know what Gojju is - it is a tangy gravy usually prepared from Tamarind. Needless to say, the gojju was excellent and I enjoyed my afternoon food. The best part of this dish is that it is very healthy - it has apples. Thought I would share the recipe with you all:

Needed Ingredients:

[1] Apples (of course) - quantity as much as you need
[2] Bell Peppers - quantity as much as you need
[3] Mustard seeds - a teaspoon
[4] Oil/Spray - a couple of teaspoons
[5] Red Chillis - about 4 or 5 depending on the level of the hotness
[6] Tamarind paste - about 1 or 2 teaspoons
[7] Sugar/Splenda - depending on the amount of tamarind you put (usually 1 or 2 teaspoons)
[8] Salt - to taste
[9] Water - as much as is needed

Recipe:

[1] Scrape the skin from the apple and cut it into several small pieces (Disclaimer: Wash the apples first)
[2] Cut the Bell peppers into small peices
[3] Place a frying pan in low flame and put some oil (healthier choice: Fat-Free Oil Spray). Allow the oil to heat for some time
[4] Once the oil is hot enough, put some mustard seeds into the pan and allow the mustard seeds to spatter
[5] Then add the apples and the bell peppers to the pan and mix well
[6] While the mixture of the apples and bell peppers cooks under low flame, prepare the tamarind solution - Mix some tamarind paste to water making sure the paste completely dissolves in water (result should be a black solution)
[7] Pour the tamarind solution into the apples and bell peppers mixture and allow the contents to cook well under low heat
[8] Add some salt and sugar (healthier choice: Splenda) to the mixture. Sugar/Splenda reduces the intensity of the tanginess of the tamarind. You forget to put this, you will end up with a very tangy gravy.
[9] Allow to cook for a few minutes. Check to see if the bell peppers and apple pieces are cooked. Once cooked turn off the flame and serve hot with rice/chapathis

I have shown a snapshot of the vegetable prepared at our home. It was really tasty especially for people who love tangy flavored dishes.

People, Enjoy!